How to use the app
EYELAND is an innovative app designed to collect georeferenced data on land cover, linear landscape elements, rural buildings and historic or culturally significant constructions to contribute to landscape conservation and to promote knowledge of our landscape and environment.
In this guide you’ll find all the necessary information to download, configure and use the app efficiently. We will guide you step by step from user registration to adding your data, allowing you to actively contribute to landscape monitoring.
Recordable elements
In order to ensure an organized and detailed data collection process, EYELAND divides recordable elements by category.
Each category allows users to monitor and record specific aspects of the rural landscape, contributing a more indepth analysis of our environment.
Below are our main categories:
AGRO FOREST
The Agro Forest category monitors agricultural and forested areas, collecting data on crops, pastures, forests and transitional spaces between natural and agricultural areas.
RECORDABLE ELEMENTS:
- Agricultural crops (fields, vinyards, orchards, vegetable gardens)
- Forests (Hardwood, conifers, mixed forests)
- Transitional areas between forests and crops
- Fallow or abandoned fields
- Wetlands and riparian zones
How to distinguish each category:
- Agricultural fields can be distinguished by the regular placement of crops and the presence of agricultural machinery or irrigation systems.
- Forests can be distinguisehed by their dense vegetation and the presence of native and introduced arboreal species.
- Wetlands and riparian zones can be found near bodies of water and are essential reservoires for biodiversity
RURAL BUILDINGS
Rural buildings represent our rural architectural heritage and provide fundamental information on the history and evolution of landuse.
RECORDABLE ELEMENTS:
- Farmhouses and farms
- Barns and silos
- Other rural outbuildings
- Buildings intended for agricultural production (olive-presses, cellars, dairies)
- Abbandoned farmhouses and ruins
How to distinguish each category:
- Farmhouses and farms generally have large internal courtyards and stalls.
- Wind or water-powered mills.
- Ruins are the remains of abandoned buildings, often covered by plant growth.
GREEN ELEMENTS
This category collects data on Linear and areal plant elements that play an essential role in biodiversity and the rural landscape.
RECORDABLE ELEMENTS:
- Hedgerows (bushes and small trees in a linear structure)
- Tree rows (single row of trees along roads or fields)
- Wooded strips (linear formations wider than hedgerows or tree rows)
- Wooded areas (large tree-covered areas)
How to distinguish each category?
- Hedgerows are long and narrow, often used as windbreaks or natural borders.
- Tree rows are composed of a single row of trees, often planted along roads or canals.
- Wooded strips are denser and wider, with multiple rows of trees and bushes.
- Wooded areas are portions of woodland, sometimes small in size, characterized by denser vegetation, including both trees and shrubs.
PAGGHIARI
Pagghiari are ancient stone buildings typical of the mediterannean, often used as shelters or agricultural storage.
Recordable elements::
- Pagghiari in dry stone
How to distinguish each category?
- Dry stone structures without mortar.
- Usually round or quadrangular in shape.
- Often found in the countryside, by vineyards or in hilly areas.
TREES
This category focuses on singular trees that may have particular environmental, historical or ecological importance.
Recordable elements::
- Monumental or centuries-old trees
- Isolated trees of notable ecological value
- Trees at high risk for cutting or disease
LANDSCAPE
This category examines the structure and visual impact of the rural landscape, taking into considerationboth natural and man-made elements
RECORDABLE ELEMENTS:
- Scenic areas and overviews
- Structures with notable aesthetic or historic value
- Combinations of green elements, buidlings and bodies of water that define the local landscape
Recordable element interface
The interface of the application for recording elements varies depending on the category of element selected during the registration phase.
The only element that does not change across the different recordable elements is the application header during the registration process, which indicates the following points:

A) Position: When clicked, it visually indicates the user’s location on the map through a blue icon.
B) Geometric survey with point: Allows the user to visually mark the position of the element to be recorded on the map.
C) Geometric survey with line: Allows the user to draw a line on the map—through multiple screen taps—to define the element to be recorded.
D) Geometric survey with polygon or area: Allows the user to highlight the element to be recorded by drawing a geometric shape directly on the map through repeated screen taps.
All variable interfaces for the recordable elements are shown below, each with its corresponding explanation.
AGRO FOREST
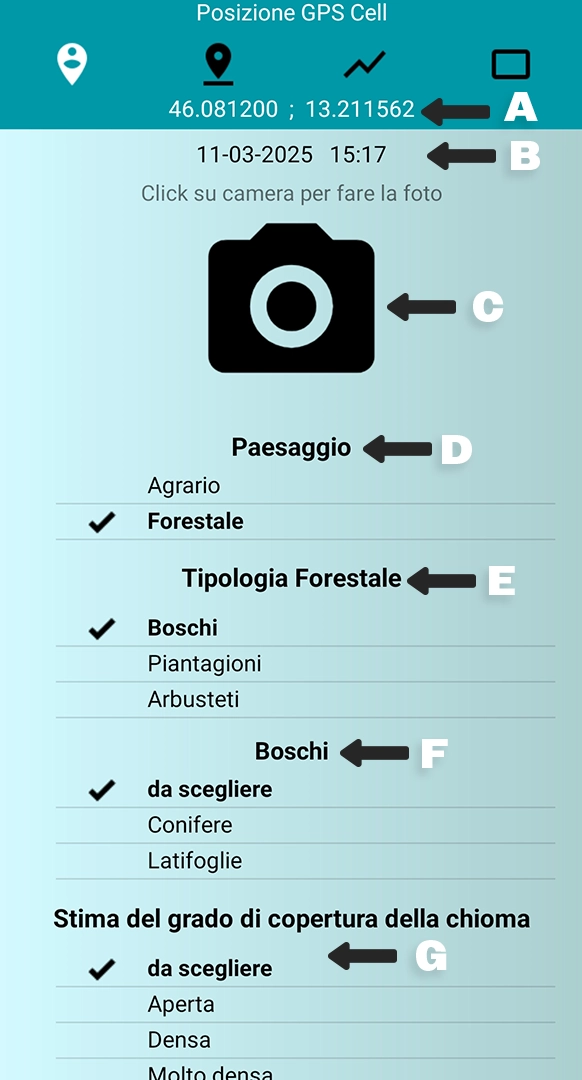


A) Position: Indicates the coordinates of your position and of the element you wish to record.
B) Date and time: Indicates the date and time of the entry. This is necessary to maintain a timeline for all entries.
C) Photo: By clicking on the camera icon, the app will open your phone’s camera to allow you to take a photo of what you are recording.
More information can be found in the tutorial at the bottom of this page.
D) Landscape: Allows the user to indicate the type of landscape observed. This selection will determine the following options. For example, by choosing “Forest“, the app will display options specific to forest environments.
Please note: The screen will display different options depending on which “Landscape” category was selected. Example: If “Landscape: Forest” was selected, the app will display choices relative to forest landscapes. For this example we will use the forest landscape option.
E) Type of forest: Allows for a more precise classification of forest type. Only one option can be selected.
F) Woods: If “Woods” was selected, this option specifies the type of wood according to its composition: Conifer or Hardwood.
G) Canopy cover estimate: Allows for an estimate of the density of the canopy cover (to what degree the sky is blocked by the canopy).
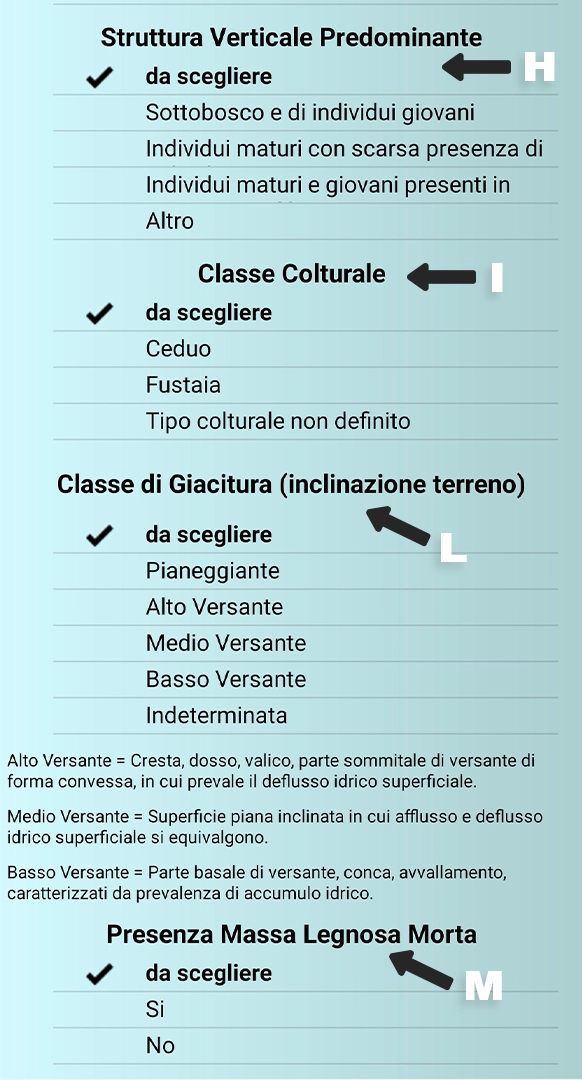
H) Predominant vertical structure: Describes the vertical structure of the vegetation, or the overall distribution of height and development among individual plants
I) Cultivation category: Indicates the type of cultivation, useful for management purposes.
L) Terrain attitude: Specifies the topographical position of the observed area, which is important to determine water flow and landscape morphology.
M) Presence of grounded deadwood: Used to indicate deadwood on the ground level, which can be useful as an indicator for ecology and biodiversity.
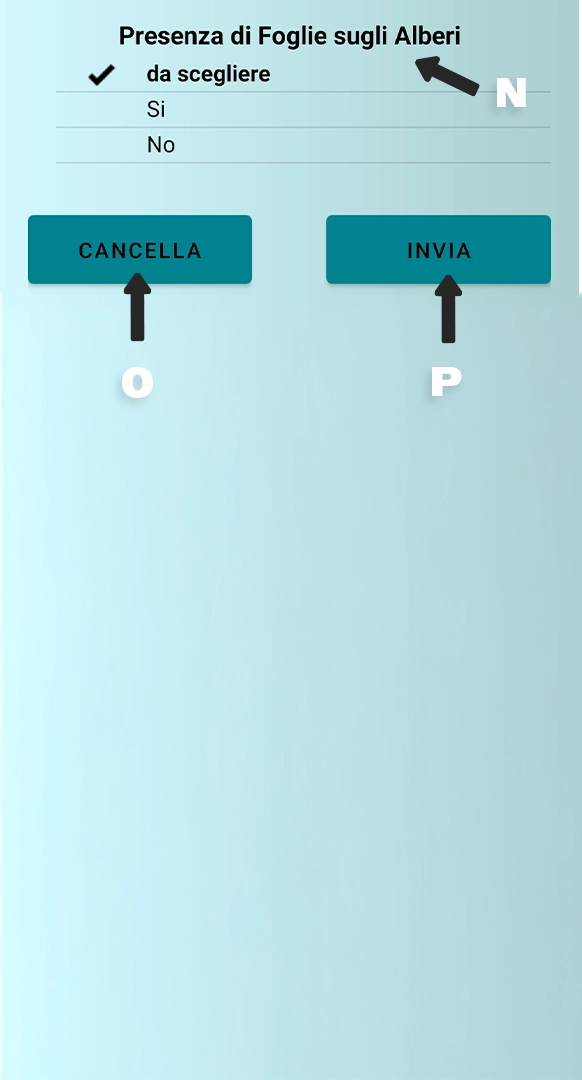
N) Presence of leaves on trees: Specifies whether leaves are still present on trees, important for phenological purposes.
O) Cancel button: Eliminates all information entered. Useful if you would like to start over.
P) Enter button: Confirms and enters all data. This is the last step to complete the recording process.
RURAL BUILDINGS
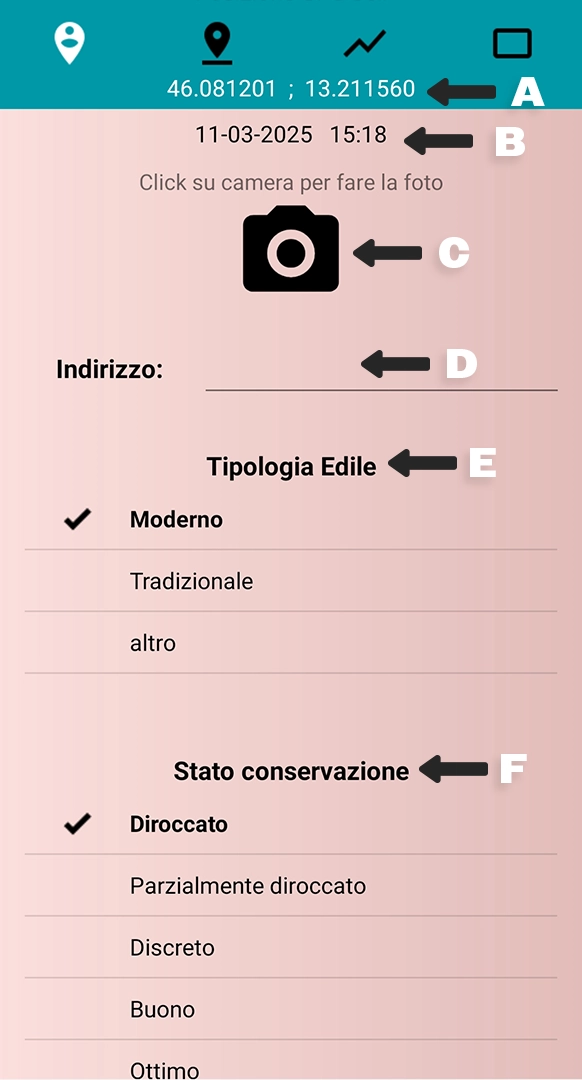


A) Position: Indicates the coordinates of your position and of the element you wish to record.
B) Date and time: Indicates the date and time of the entry. This is necessary to maintain a timeline for all entries.
C) Photo: By clicking on the camera icon, the app will open your phone’s camera to allow you to take a photo of what you are recording.
D) Address: Manually enter the building’s address. You may enter a street name, township or local landmark to identify the location. This information is complementary to the GPS data (already recorded above) and helps give an idea of location.
E) Building type: Classifies the building according to their construction type. This information is necessary when considering any repair work from an architectural and cultural point of view.
F) State of conservation: Indicates the actual state of the building, useful when considering restoration, safeguarding or cataloguing of rural construction heritage. This classification is important for both tecnical and administrative purposes.
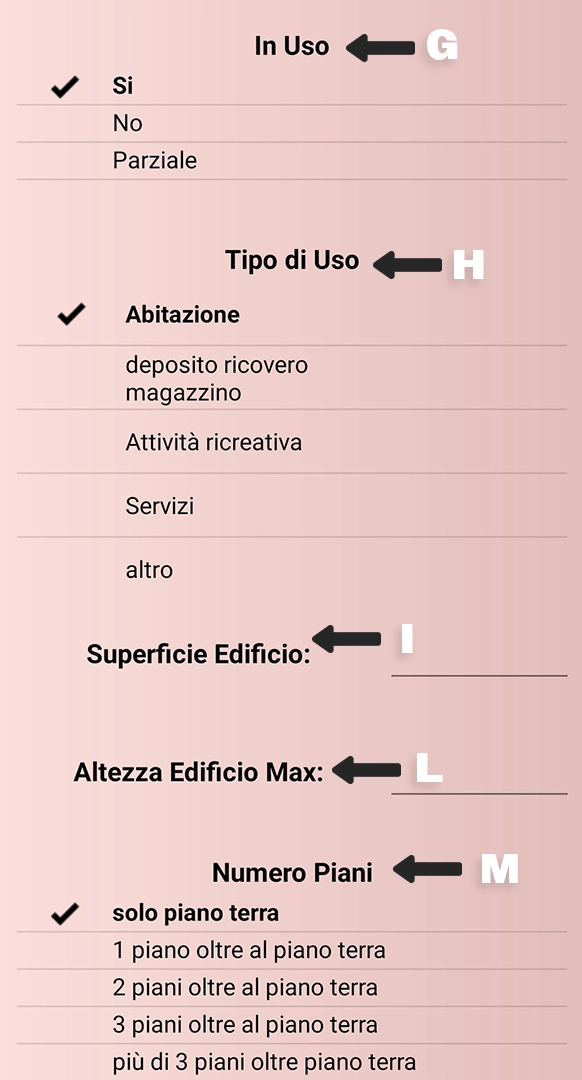
G) In Use: Allows the user to specify if the building is currently in use or not. Useful to determine abandonment, decline or current activity.
H) Type of use: Describes what the building is used for.
I) Floor surface area: Text field where the user can manually insert the total floor surface area in square meters (m²). This is quantifiable data useful for volumetric classification.
L) Max building height: Indicates the maximum height of the building, or the distance between the ground and the building’s tallest point (in meters).
This must also be entereed manually.
M) Number of floors: Indicates the total number of floors in the building.
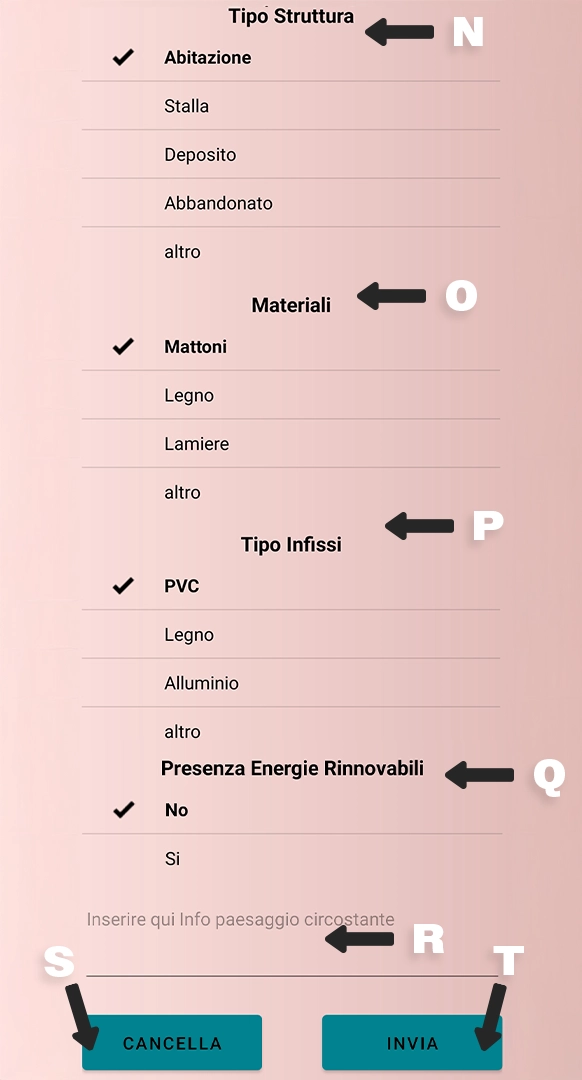
N) Building type: Classifies the building according to its original or predominant use.
O) Materials: Specifies the main building materials used.
P) Type of fixtures: Indicates the type of fixtures (on windows, doors, joints)
Q) Renewable energy presence: Allows users to indicate the presence of renewable energy systems (ex: solar panels, solar thermal panels, mini wind turbines).
R) Landscape information: The user can input observations on the landscape surrounding the building. Example: “hilly landscape”, “surrounded by vineyards”, etc.
S) Cancel button: Eliminates all information entered. Useful if you would like to start over.
T) Enter button: Confirms and enters all data. This is the last step to complete the recording process.
GREEN ELEMENTS
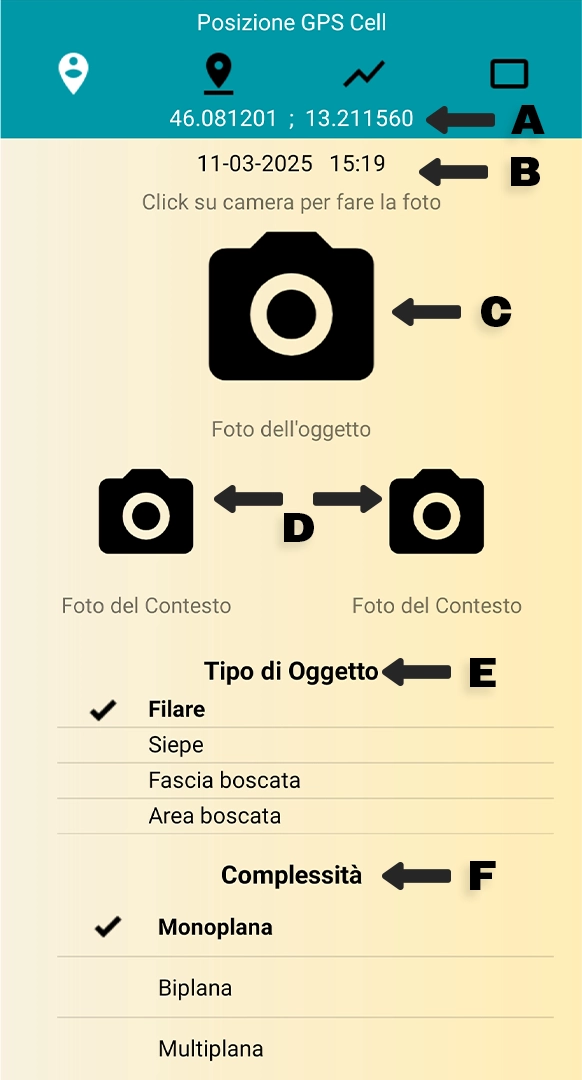
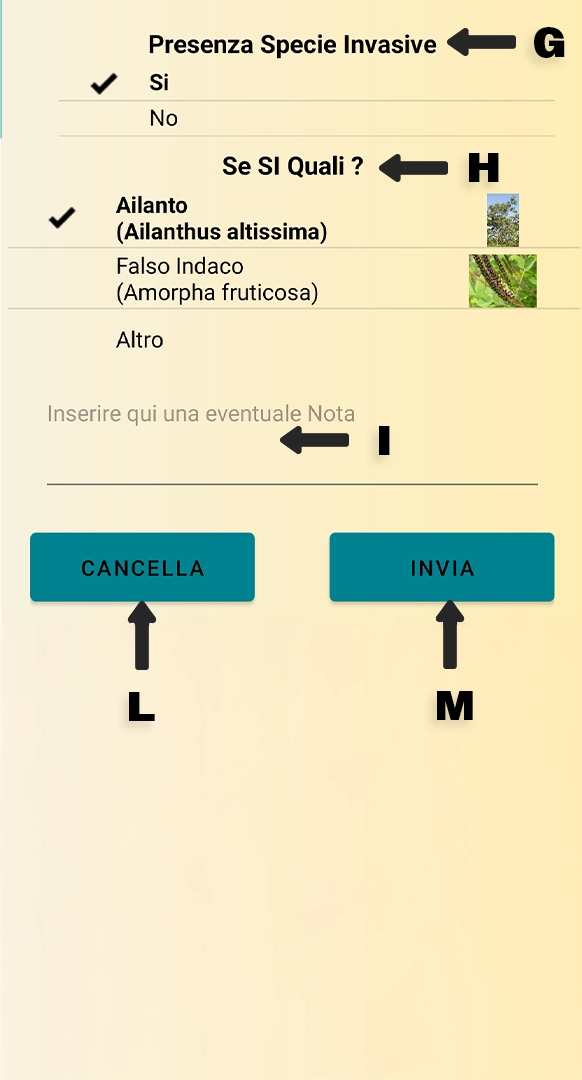
A) Position: Indicates the coordinates of your position and of the element you wish to record.
B) Date and time: Indicates the date and time of the entry. This is necessary to maintain a timeline for all entries.
C) Photo: By clicking on the camera icon, the app will open your phone’s camera to allow you to take a photo of what you are recording.
D) Landscape context photo: This function allows the user to take two additional photos, useful for contextualizing the element recorded within the surrounding landscape. The user can photograph, for example, the surrounding view, the insertion into the landscape, or nearby plants.
By clicking on these buttons, the app will open your phone’s camera.
E) Object type: Classifies the green element into categories defined by the typology and organization of the plants.
F) Complexity: Defines the vertical structure of the vegetation.
G) Presence of invasive species: Allows users to indicate if there are invasive species present within the green element, which can alter its ecological balance.
H) “If yes, which?”: Only needs to be filled if “yes” was selected for the previous option on invasive species. Allows the user to specify what type of invasive species are present, with photos to assisst in identification.
I) Note: A space to indicate additional annotations on the recorded element or teh surrounding area. Can be used to indicate tecnical details, specific informatio or environmantal notes not considered in the standard options.
L) Cancel button: Eliminates all information entered. Useful if you would like to start over.
M) Enter button: Confirms and enters all data. This is the last step to complete the recording process.
Pagghiari
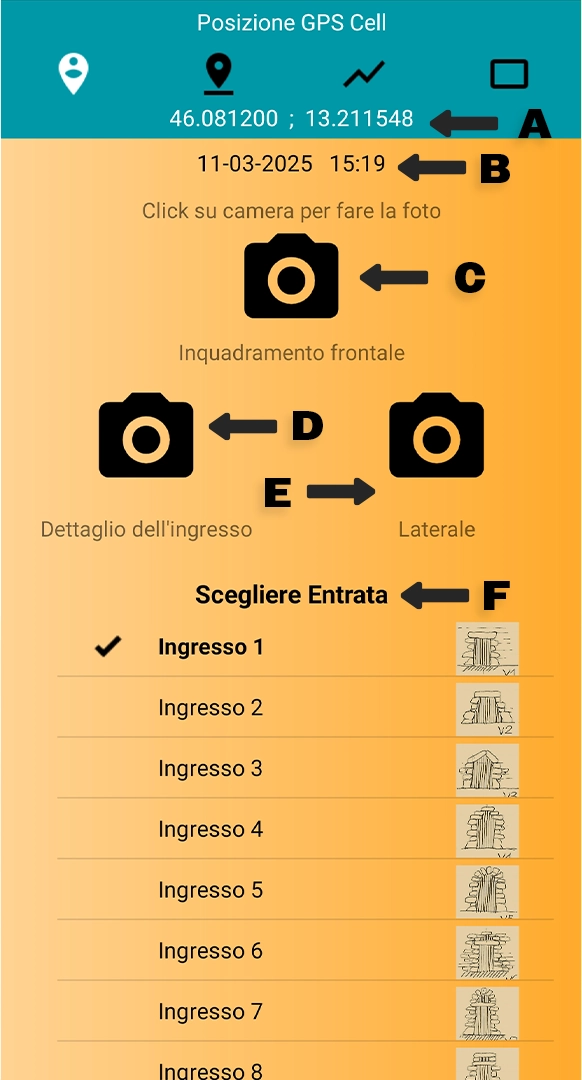
A) Position: Indicates the coordinates of your position and of the element you wish to record.
B) Date and time: Indicates the date and time of the entry. This is necessary to maintain a timeline for all entries.
C) Front-facing photo: By clicking on the camera icon, the app will open your phone’s camera to allow you to take a photo of the front of the entrance.
D) Entrance detail: Used to take a close-up photo of architectural or decorative details on the doorway. This is useful for emphasizing materials, carvings, construction techniques or other artistically or historically significant details.
E) Lateral view: Allows users to take a photo from a lateral view to document the building depth, wall thickness, and relationship between the entrance and the rest of the structure. This image adds to the visual documentation.
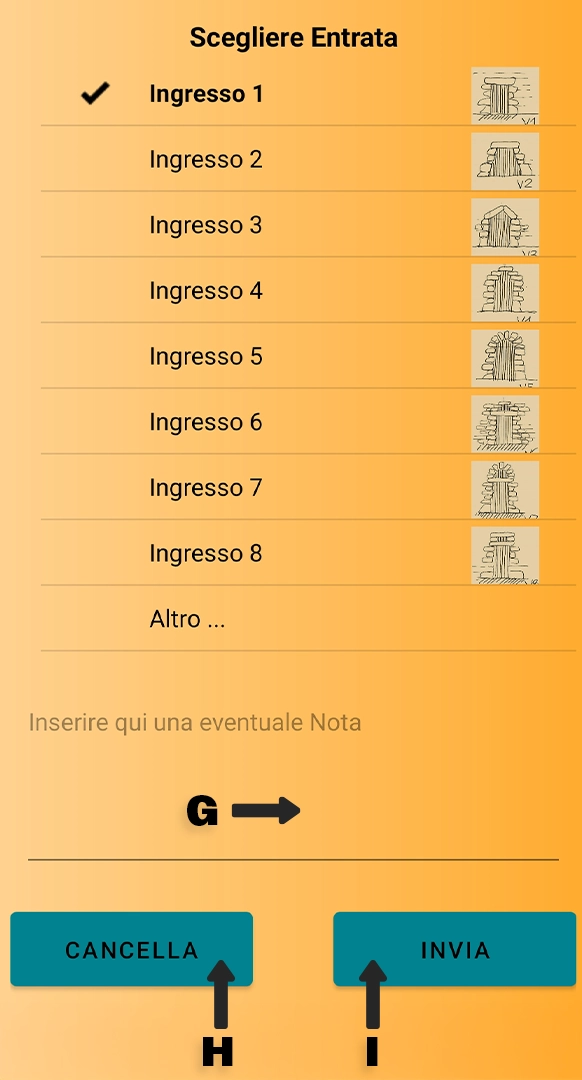
F) Entrance: Here users can select the type of pagghiaru entrance observed. Each option is accompanied by illustrations for ease of identification.
This section is important for morpholgical and type analysis of traditional building heritage.
G) Notes: A space to indicate additional observations not covered by the previous options. Examples: “entrance is partially collapsed”, “no decorative elements”, “recent modifications to the structure”.
H) Cancel button: Eliminates all information entered. Useful if you would like to start over.
I) Enter button: Confirms and enters all data. This is the last step to complete the recording process.
TREES
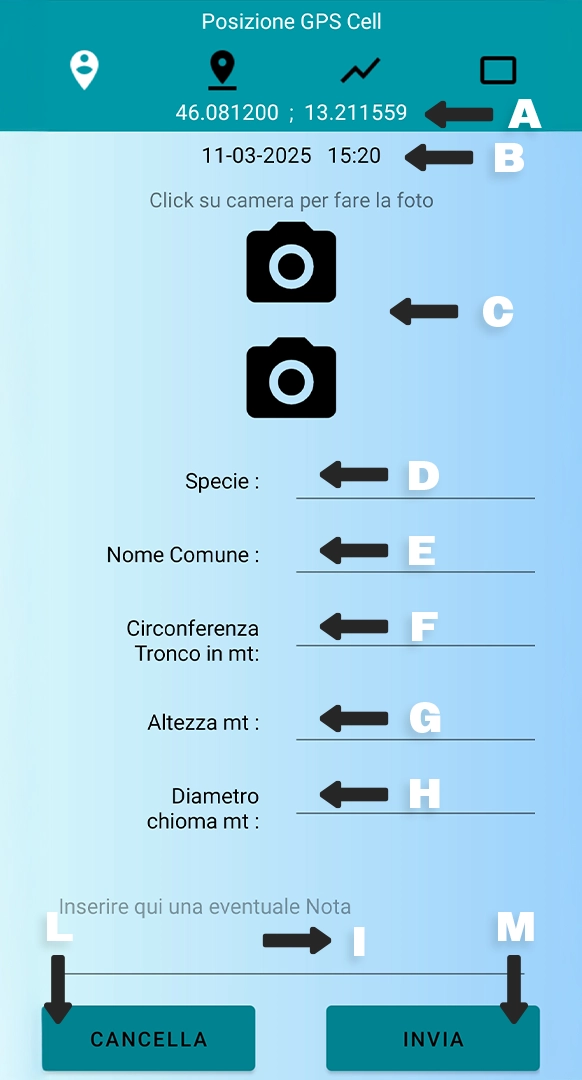
A) Position: Indicates the coordinates of your position and of the element you wish to record.
B) Date and time: Indicates the date and time of the entry. This is necessary to maintain a timeline for all entries.
C) Photo: You can take two photos of the tree you wish to record.
-
The first should be a picture of the whole tree.
-
The second foto can be of a significant detail (ex: leaf, bark, fruit or base of the trunk)
Both photos are needed to correctly document the individual tree.
D) Species: Type in the scientific name of the tree species (ex: Quercus robur). The use of correct botanical nomenclature is preferrred to maintain uniform data.
E) Common name: Indicates the commonly used name for the species (ex: “Oak”, “Olive”, “Cherry”). Useful if the user does not know the tree’s scientific name.
F) Trunk circumference in meters: Insert the trunk circumference in meters, generally measured at 1,30 m from the ground (a standard height also known as “chest height”). This information is important in order to estimate the tree’s age and volume.
G) Height in meters: Enter the estimated height of the tree in meters. This can be determined visually or using specific tools (inclinometer or specific app).
H) Canopy diameter in meters: Indicate the maximum width of the tree canopy in meters (or the diameter of the canopy’s projection on the ground) This is useful for calculating shade cover and the space taken up by the tree.
I) Notes: Free space to enter any additional observations about the tree.
L) Cancel button: Eliminates all information entered. Useful if you would like to start over.
M) Enter button: Confirms and enters all data. This is the last step to complete the recording process.
LANDSCAPE
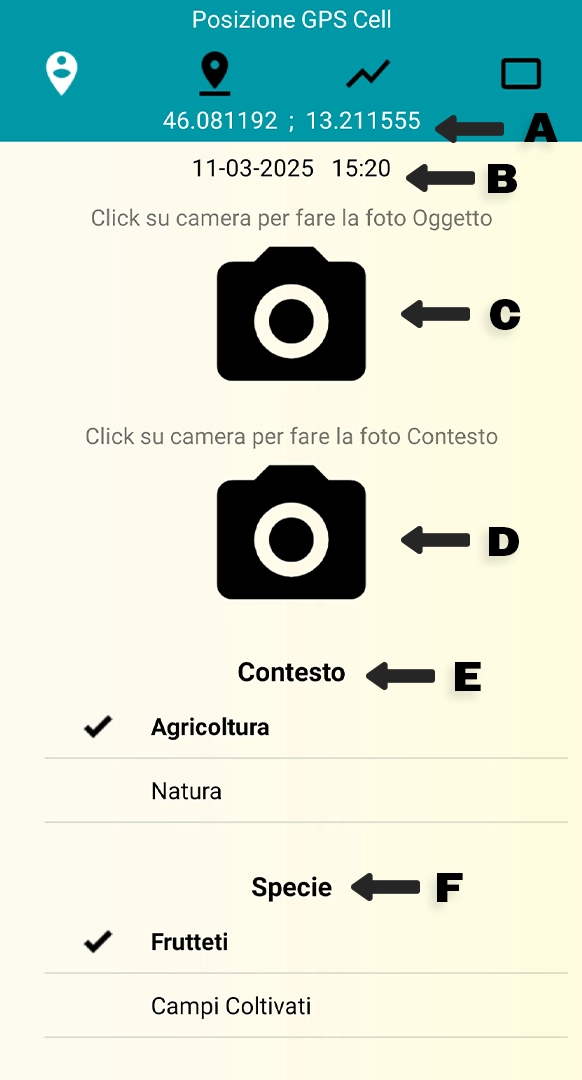
A) Position: Indicates the coordinates of your position and of the element you wish to record.
B) Date and time: Indicates the date and time of the entry. This is necessary to maintain a timeline for all entries.
C) Photo of the object: By clicking on the camera icon, you can take a picture of the natural element you wish to record. The photo should clearly show the object in center field (ex: vineyard, field, orchard).
D) Context photo: Allows the user to take a picture of the surrounding environment. This helps to understand the object’s placement within the landscape and its interaction with the landscape (ex: urban outskirts, hilly context, coastal area, etc.).
E) Context: Allows the user to select the type of landscape the object is found in.
F) Species: Classifies the type of agricultural element present.
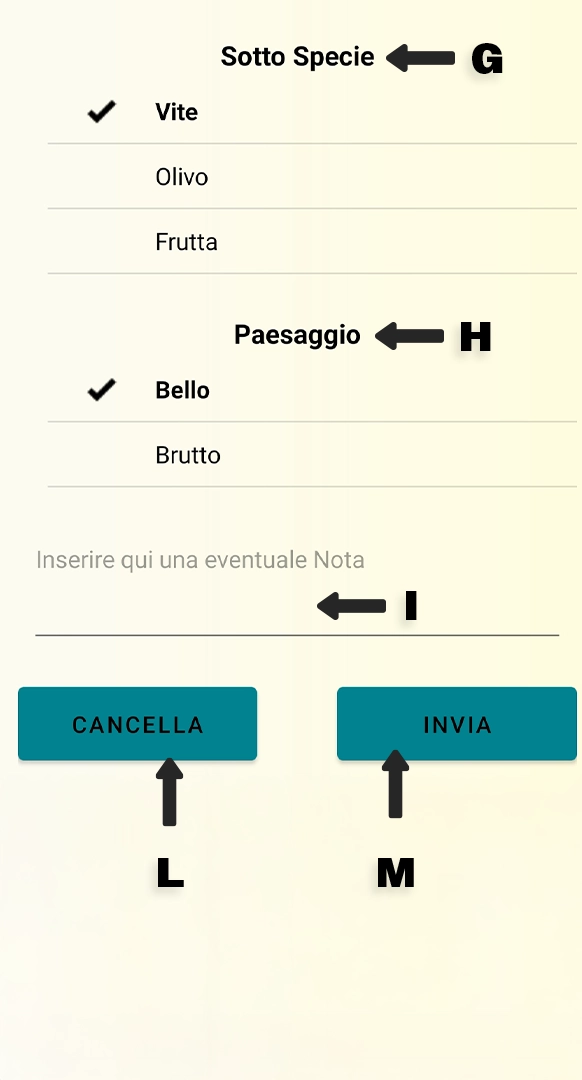
G) Subspecies: Allows a more detailed crop classification.
H) Landscape: Records a subjective aesthetic opinion on the observed landscape. This is used to record qualitative data
I) Notes: Free pace in which the user can add observations not covered by the previous options.
L) Cancel button: Eliminates all information entered. Useful if you would like to start over.
M) Enter button: Confirms and enters all data. This is the last step to complete the recording process.
